

Few things cause more anxiety for a homeowner than discovering a crack in a shower pan. It’s not just an aesthetic blemish; it’s a structural red flag. A single hairline fracture in an acrylic or fiberglass base can allow gallons of water to seep into the subfloor every time someone bathes. Over time, this moisture invites black mold and compromises the wooden joists holding up your bathroom floor.
Can it be repaired? In many cases, the answer is a resounding yes. If you catch the damage before the subfloor becomes “mushy,” a high-quality epoxy resin repair can extend the life of your shower by years. This guide is designed to take you from a panicked discovery to a professional-grade finish. We will cover the science behind why these cracks form, a deep dive into the materials required for a permanent bond, and a meticulous step-by-step restoration process.
What Causes a Shower Pan to Crack?
Understanding the root cause is vital. If you fix the crack but don’t address the cause, the repair will likely fail within months.
Poor Installation & Lack of Support
Most shower pans are made of fiberglass or acrylic. These materials are durable but thin. During installation, it is industry best practice to set the pan into a “mortar bed.” This involves laying a mound of thin-set mortar on the subfloor before pressing the pan into place. Without this, there is an air gap between the pan and the floor. Every time you step in the shower, the plastic flexes. This repeated “trampoline effect” eventually leads to stress fractures.
Heavy Weight Impact
Impact damage is straightforward but common. Dropping a heavy glass bottle, a metal showerhead, or even a heavy tool during a separate bathroom renovation can create a “star-shaped” crack or a deep chip in the gel coat.
Weak Subfloor & Settling
If your home is settling or if there has been previous water damage, the plywood subfloor may warp. If the floor underneath moves, the rigid shower pan cannot move with it, resulting in a snap.
Age, Wear, and Chemical Degradation
Acrylic and fiberglass have a lifespan. Over 15–20 years, the material loses its plasticizers and becomes brittle. Furthermore, using abrasive cleaners (like bleach or scouring pads) can thin the protective gel coat, making the pan more susceptible to cracking under normal body weight.
Can You Repair a Cracked Shower Pan?
Before committing to a DIY project, you must perform a “triage” on your shower.
Small Cracks vs. Major Structural Damage
- Surface Repairs: If you have a chip, a scratch, or a hairline crack (less than 5 inches) and the floor feels rock-solid when you stand on it, a DIY repair is highly effective.
- Structural Failures: If the crack is wide enough to fit a coin into, or if you hear a “crunching” sound when you step near it, the support system underneath has likely failed. While you can still patch the crack, you must also address the void underneath (often by injecting expanding structural foam through a small hole).
Comparison Table: Repair vs. Replace
Feature | DIY Epoxy Patch | Professional Refinishing | Full Replacement |
Best For | Minor cracks & chips | Extensive staining/cracking | Structural rot/Renovation |
Estimated Cost | $25 – $70 | $500 – $900 | $2,000 – $5,000 |
Durability | 2–5 Years | 5–10 Years | 20+ Years |
Skill Level | Beginner | Intermediate | Expert / Contractor |
Downtime | 24–48 Hours | 24 Hours | 4–7 Days |
Tools & Materials Needed: A Deep Dive
To perform a professional-grade repair that lasts for years, you need more than just a patch kit. Here is the full inventory:
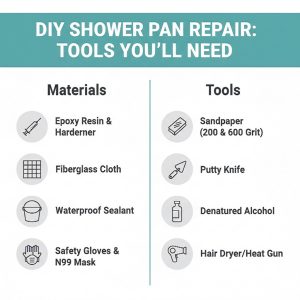
- Epoxy-Based Repair Kit: Choose a kit specifically for “Fiberglass and Acrylic.” Ensure it includes a catalyst (hardener) and a color-matching paste.
- Fiberglass Reinforcement Mesh: This is crucial for any crack longer than two inches. It acts like rebar in concrete, providing tensile strength.
- Denatured Alcohol or Acetone: You need a high-strength solvent to remove body oils and soap scum that household cleaners leave behind.
- Sandpaper Grits: You need a range. Start with 200-grit for roughing the surface, and have 400, 600, and 2000-grit wet/dry paper for the final polish.
- Safety Equipment: Epoxy resins emit Volatile Organic Compounds (VOCs). Always wear an N95 mask and nitrile gloves.
Step-by-Step: How to Fix a Cracked Shower Pan
Step 1: Dry & Clean the Area
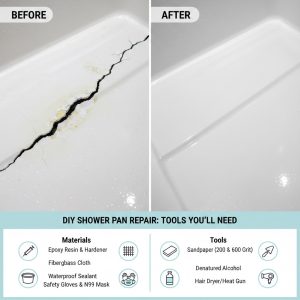
The #1 reason repairs fail is trapped moisture. Use a hair dryer on a low setting to blow air into the crack for 5–10 minutes. Once bone-dry, scrub the area with denatured alcohol.
- Pro Tip: Use a toothbrush to get the alcohol into the crack itself to kill any hidden mold spores.
Step 2: Sand and “V” the Crack
Use your 200-grit sandpaper to scuff the area around the crack. If the crack is very tight, use a Dremel tool or a utility knife to slightly widen the top of the crack into a “V” shape. This allows the epoxy to sit inside the crack rather than just on top of it.
Step 3: Mixing and Tinting
Follow the manufacturer’s instructions to mix the resin and hardener. If your kit allows for color matching, add the tint one drop at a time.
- Pro Tip: The color often dries a shade darker than it looks when wet. Test a small dab on a piece of cardboard first.
Step 4: Applying the Fiberglass Patch (Optional but Recommended)
For structural integrity, cut a piece of fiberglass mesh slightly larger than the crack. Apply a thin layer of epoxy, lay the mesh down, and then apply more epoxy over the mesh until it becomes transparent.
Step 5: Leveling and Curing
Smooth the epoxy with a putty knife so it is slightly higher than the surrounding floor (it will shrink slightly as it cures). Allow it to sit undisturbed for a minimum of 24 hours.
Step 6: The Multi-Stage Sanding Process
Once fully cured, begin sanding with 400-grit paper. Move to 600-grit, and finally, 2000-grit wet-sanding (using a little water) to achieve a mirror-like finish.
Step 7: Final Test for Leaks
Wipe the area clean and perform a “static test.” Block the drain, fill the pan with two inches of water, and mark the water line. Wait 30 minutes. If the water level drops, the leak is still active.
How Much Does It Cost?
- DIY: Total spend is usually under $100. This covers the kit, safety gear, and high-grit sandpaper.
- Professional: Expect to pay $400–$800. You are paying for the technician’s ability to “blend” the paint so you can’t see the repair.
- Replacement: This is the nuclear option. A new pan costs $300–$800, but the labor to remove tile, fix plumbing, and install the new base can easily drive the total to $3,500.
How Long Does a Shower Pan Repair Last?
A high-quality epoxy repair isn’t a “forever” fix, but it can be a long-term one.
- Small chips can last a decade.
- Stress cracks usually last 2–3 years if the underlying support issue isn’t fixed.
- Quality of Seal: If you use a UV-resistant sealant, the patch won’t yellow or pull away from the edges as quickly.
When Should You Replace Instead of Repair?
If you encounter any of the following, put down the epoxy and call a contractor:
- The “Squish” Factor: If you step on the floor and it feels like a wet sponge, the subfloor is gone.
- Spiderwebbing: Extensive fine cracks across the entire pan indicate the plastic has reached the end of its life.
- Black Mold: If mold is growing out from under the pan, the water damage is already deep in the walls.
Best Shower Pan Repair Kits
- Best Overall: MagicEzy Bath & Sink Repair – Great for beginners with easy color matching.
- Best Professional Strength: Rust-Oleum Tub & Tile Repair – High-durability epoxy.
- Best for Large Cracks: Devcon Fiberglass Repair Kit – Heavy-duty mesh for structural fixes.
FAQs
Can you use Flex Seal on a cracked shower pan?
Absolutely not. Flex Seal is designed for gutters and non-load-bearing surfaces. Under the weight of a standing human, it will peel and trap bacteria.
Is it covered by insurance?
Standard homeowners insurance covers “accidental and sudden” discharge of water. A slow crack due to age is considered “maintenance” and is rarely covered.
How do I know if the crack is leaking?
Go to the room directly below the shower. If you see yellow staining on the ceiling or feel moisture, the crack is fully “through-and-through.”
Final Thoughts
A cracked shower pan is a race against time. The longer you wait, the deeper the water travels. By following this guide, you can restore your shower’s waterproof barrier for a fraction of the cost of a remodel. Remember: preparation is 90% of the job. Clean deep, dry thoroughly, and sand carefully for a professional result