If you’re reading this, you probably hear it—that annoying, phantom flushing sound of a toilet constantly running, or maybe you’re facing a weak flush that just can’t get the job done. That sound, my friend, is literally your money going down the drain. The culprit is usually a faulty toilet flush valve.
As a home improvement enthusiast who’s spent too many weekends wrestling with plumbing, I can tell you what happens next: You search online and immediately see instructions telling you to remove the entire porcelain tank. Talk about a nightmare! That job is heavy, messy, and risks cracking the tank or bowl. But what if I told you there’s often an easier way? This simple, insider method can save you time, money, and that ridiculously messy tank removal. Let’s get your toilet fixed and your sanity restored.
🚽 Can You Replace a Flush Valve without Removing the Tank?
This is the million-dollar question, and I’m happy to give you the honest answer: Yes, for the most common repairs, you absolutely can!
The secret lies in the distinction between the massive flush valve assembly (the body bolted to the tank) and the specific, cheap parts that actually fail (the seals or flappers). Most modern toilets, particularly those with canister-style valves (like Kohler), allow you to replace the critical sealing gasket with nothing more than a simple twist and lift.
When The Shortcut Works (And When It Doesn’t)
Pros of the No-Tank-Removal Method | Cons & Exceptions |
Saves up to two hours of labor time. | May not work for all older toilet models (especially metal or brass valves). |
Eliminates the risk of cracking the tank or stripping the mounting bolts. | You must remove the tank if the main plastic body is cracked or leaking underneath. |
Requires zero specialized plumbing tools (just your hands and a towel). | Requires an exact match replacement seal or flapper. |
No plumber needed. You handle the fix yourself! |
If your leak is due to a simple seal or flapper failure—and it almost always is—you skip the back-breaking bolt removal. This is the ultimate DIY win!
🧰 Tools and Materials You’ll Need
Before starting, gather your gear. I always tell friends to keep a spare kit handy—it’s like having a fire extinguisher for a plumbing emergency.
- Replacement Flush Valve Seal or Repair Kit: Ensure you have the right one! Check your tank brand (e.g., Kohler, TOTO, Fluidmaster). This is the key to success.
- Sponge or Towel: You need something to wick up the residual water. A large, thick sponge works best for maximum absorption.
- Adjustable Wrench: Only needed for disconnecting the supply line (which you may need to do to access the fill valve nut, depending on your setup).
- Small Bucket: Perfect for draining any remaining water you can’t sponge up.
- Rubber Gloves: I’m not judging, but it is toilet water. Wear your gloves.
- Optional: Plumber’s tape for reconnecting the supply line, just in case you need to touch that fitting.
✅ Step-by-Step Guide: How to Replace the Flush Valve Seal
We focus on the seal replacement because that’s the part you can change without heavy lifting. This method applies to most canister and flapper-style systems.
Step 1: Turn Off the Water Supply
Locate the shut-off valve behind or near the base of the toilet. Turn the valve clockwise until it stops completely. I always turn my sink faucet on briefly just to confirm the water is really off; that extra check saves a potential flood.
Step 2: Drain the Tank
Flush the toilet once and hold the handle down until all the water drains out of the tank. Next, use your sponge and bucket to soak up every last drop of water remaining at the bottom of the tank. You want a completely dry working environment.
Step 3: Remove the Flapper or Seal
How you approach this depends entirely on your Toilet flush Valve types:
- For Flapper-Style Valves: Gently unclip the rubber flapper from the ears or pegs on the overflow pipe. Unhook the chain from the flush lever. Set the old flapper aside.
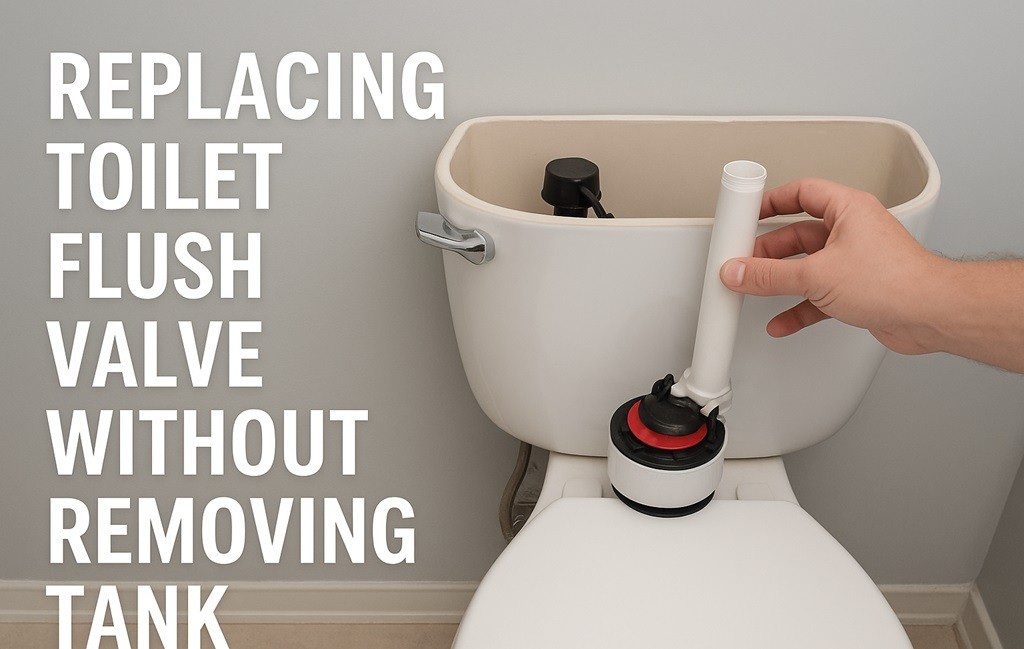
- For Canister/Tower Valves (Modern Toilets): Grab the top of the large plastic canister. Twist it counter-clockwise about a quarter turn and lift the entire unit straight up and out. This is where the magic happens!
Step 4: Inspect the Flush Valve Area
Take a look at the base where the flapper or canister sat. This is the flush valve seat. If you see pitting, mineral buildup, or corrosion, gently clean the area with a soft sponge and vinegar solution. You want a smooth, clean surface for the new seal to sit on.
Step 5: Replace the Valve Seal or Gasket
If you lifted out a canister valve in Step 3, you’ll see a thick rubber ring at the bottom. Carefully peel off the old rubber gasket (this is the actual sealing mechanism). Install the new seal, making sure it sits perfectly flat and is aligned correctly. This replacement of the rubber seal is the actual process of “replacing flush valve without removing tank.”
Step 6: Reinstall the Flapper and Reconnect the Chain
If you have a flapper system, clip the new flapper back into place. For both flapper and canister valves:
- Canister: Drop the unit back into its base and twist it clockwise until it locks securely into place. You should hear a satisfying click.
- Flapper: Reconnect the chain. Leave just enough slack (maybe 1-2 links) so the flapper sits flat, but not so much that it hangs loose.
Step 7: Turn Water Back On & Test the Flush
Slowly turn the water supply valve back on. Allow the tank to fill completely. Listen closely! Do you hear the running water stop completely? Wait a few minutes, then test the flush. Check for any leaks around the base or supply line. I always flush three times—it’s a personal superstition—to ensure a full, successful repair.
🛑 Common Mistakes to Avoid
Even a simple fix can go sideways. I know; I’ve made all these errors so you don’t have to!
- Forgetting to Sponge Up All Water: Don’t skip Step 2! Water hides debris and makes it impossible to properly seat a new seal or gasket. The tank interior must be dry.
- Using the Wrong Size Flapper: Thinking a 2-inch and 3-inch flapper are interchangeable is a classic mistake. They are not! Measure your existing flush valve opening before buying a new one.
- Failing to Align the Seal Properly: If the new rubber seal or gasket is even slightly twisted or kinked, it creates a small gap. That small gap leads to a constant running leak. Ensure the seal sits perfectly flat.
- Over-Tightening the Connections: If you disconnected the supply line or the fill valve nut, remember to tighten everything snugly, but never crank it with excessive force. You risk cracking the porcelain or stripping the plastic threads.
⚠️ Signs You May Need to Remove the Tank Instead
Sometimes the easy route is blocked. When you encounter one of these signs, put down the sponge and prepare for the full tank removal (refer back to my earlier discussion about the full flush valve replacement steps).
- Cracked Tank Base: If you spot a hairline crack near the flush valve opening, the tank is structurally compromised. No amount of tightening will save it.
- Corroded Mounting Bolts: The bolts holding the tank to the bowl are seized with rust. Trying to loosen the nuts could twist or break the bolts, requiring total disassembly anyway.
- Flush Valve Assembly Not Accessible: You own an old, unusual, or discontinued toilet where the valve mechanism doesn’t allow for an easy-to-remove seal. How to replace flush valve on older toilet often means accepting the tank removal challenge.
✨ Maintenance Tips to Extend Your Toilet’s Life
Once you’ve done the repair, you want it to last! A little love goes a long way.
- Regular Cleaning of the Valve Area: Use a soft cloth and a gentle cleaner (like vinegar) to periodically wipe down the flush valve seat and flapper/seal.
- Check Seals Every 6–12 Months: During your bathroom cleaning routine, take off the tank lid and look inside. Ensure the flapper is sitting flat and the chain has the correct slack.
- Use Gentle Cleaners: Avoid dropping those harsh blue chemical pucks into your tank! They are notorious for eroding the rubber and plastic components inside the toilet, making your seals fail much faster.
🏆 Recommended Flush Valve Kits (My Top Picks)
If you need to replace the entire valve or just want a reliable seal replacement kit, these are the brands I trust most. They offer great solutions for your Toilet flush Valve types.
- Fluidmaster 400A Universal Valve: This is the king of fill valves. While not strictly a flush valve, replacing a faulty fill valve (which is always a no-tank-removal job) often solves a running toilet problem. It’s affordable, easy to install, and built to last.
- Korky QuietFILL Platinum Valve: A fantastic choice if your toilet is loud when refilling. This valve focuses on quiet operation and long-lasting seals, helping with leak prevention.
- Specific Brand Canister Seals (Kohler/TOTO): If you have a newer, high-efficiency toilet, always buy the Original Equipment Manufacturer (OEM) seal. Generic seals often don’t have the exact fit required for these unique designs, leading to failure.
❓ Frequently Asked Questions (FAQ)
Q: Can I replace a flush valve seal without removing the tank?
A: Absolutely, yes. For most modern toilets, you only need to twist, lift, and replace the rubber seal or flapper. This is the ultimate “flush valve repair without tank removal.”
Q: How do I know if my flush valve is leaking?
A: The easiest way is the dye test. Drop food coloring into the tank. If the color appears in the bowl within 15 minutes without flushing, the flush valve (or its seal/flapper) is leaking.
Q: What’s the difference between a flush valve and a flapper?
A: The flush valve is the large plastic assembly bolted to the bottom of the tank. The flapper is the rubber stopper or seal that lifts up to let the water out.1 The flapper is a part of the flush valve system.
Q: How long does a flush valve last?
A: The main plastic body of the flush valve can last 15–20 years. The rubber seals, flappers, and gaskets, however, need replacement every 3 to 5 years.
Q: Do all toilets have the same flush valve size?
A: No, they do not. The most common sizes are 2-inch and 3-inch. High-efficiency toilets almost exclusively use the 3-inch size for a faster, stronger flush. You must match the replacement part to the original size.
💡 Conclusion
You now know the insider secret: Replacing a flush valve without removing the tank is entirely possible if you focus on the seal or flapper, which is the part that actually fails 99% of the time. You save yourself hours of messy, frustrating labor and avoid the risk of damaging your toilet.
This is a simple, highly effective DIY repair that boosts your confidence and keeps your money in your wallet instead of letting it run down the drain. You have the knowledge and the skills now—go try the repair yourself!